Friday, December 31, 2010

More cedar siding


Just wanted to post another pic or two of what the house looks like. We covered up the last of the Tyvek house wrap before the blizzard hit about two weeks ago. In the image above you can see the 1/4" furring strips being used to maintain the air gap behind the siding. In view, from left to right, are the external outlet, the external plug (electrical input for the house), and a piece of plywood where we may mount a second input (to connect solar panels in the future).

Friday, December 3, 2010

Cedar siding, first two days

In the span of two afternoons, one exterior wall is officially on its way to being covered with cedar siding. Thank you, forests! Thank you, power tools! Thank you, people who helped out! Thank you, weather gods for not releasing any rainstorms! (and, thank you, exclamation points)

Here is the photographic evidence:


First we put up the 1/4"-thick furring strips to create an airgap between the side of the house and the cedar. This is needed so that if any moisture gets trapped it can escape.


We then used an extra piece of roofing material to make a skirt over the front lip of the trailer.


And, many hours later (probably ~12 person-hours, to be precise), it's a win! We're using 7d 2-1/4" stainless steel ringshank nails and, in so doing, realizing that a pneumatic nail gun would make this go a lot faster.
The cedar (aka Western Red Cedar shake) was ordered from a lumberyard up the street. It's "clear" cedar meaning not primed with paint. It's 5-1/2" in width. A useful tip: put a brand new blade in the chopsaw if you want super amazing cuts.
In this image, a lone house builder, having completed the day's goal of getting the siding done up to the top of the window, looking for something else to do aims the hammer at, logically, a box of nails.

Monday, November 8, 2010

Representative Wall Section

Yesterday we put up a "test section" of the knotty pine interior siding (5/16"-thick T&G) to see how it works. It seems doable (well, we ARE superheroes, after all). Here are some pictures to illustrate what the walls are like:
First you cut the insulation to size; if you're a perfectionist, you will spend waaay too long on this step making sure there are no gaps anywhere. Then you put the plastic sheeting over it (6 mils thick) and follow that with the siding itself. Alright! Now we know what a wall is going to look like.


Rather than using finishing nails we used some ribbed nails just in case. It is probably fine to use normal nails everywhere for the siding since if one is vibrating out you can just pound it back in. The rationale for using screws everywhere in the framing/sheathing is that those won't be accessible later and you don't want the house falling apart while driving/vibrating down the road/etc. For the interior siding we plan to use nails.

The area in the photo is directly above the porch. The thought was that this area will be much easier to access now (prior to installing porch roof) than later.

Tuesday, November 2, 2010

Roofing Part II

Per-panel installation time today was fabulous; two of us completed the entire other straight run of panels in less than 3 hours. All that remains is the front portion (aka complicated parallelogram fanciness) and then the roof will be water, snow, and weather resistant (not to mention resistant to alien lasers from outer space).

In the following image, the finished Side 2 of the roof is illuminated by a victoriously lofted work light. The raised arm symbolizes victory over difficult odds (the early time of sunset) while the scattered light (there are billions of photons) represents the infiniteness of human potential (there are billions of people). Fine art photography at its finest.

We will not reveal that this picture was taken with a camera phone.


Special thanks is owed to our generous friend who delivered tubes of 100% silicone to our doorstep just in time for us to install the final two panels, completing our goal of installing all of the long panels before the end of the day. Additional thanks to the Talking Heads for providing our inspiring soundtrack. This ain't no party. This ain't no disco. This ain't no foolin' around. This is a tiny house coming together little by little -- and with a nearly-completed roof, to boot!

Monday, November 1, 2010

Installing a Standing Seam Metal Roof

The roof is officially halfway done tonight! We started putting up panels on Saturday/Sunday; the panels on the straight sections go fairly quickly (~15 min per panel) but the front of the house (replete with complicated "dormer window"-style attic vent) is taking some time, so we put some focus on cutting panels for that and installing the hip ridge. The roofing system is great: steel SnapLoc panels by Admiral Bradco, pre-painted. In considering corrugated metal or other options this looked like a very long-lasting option which poses no prohibitive costs or installation challenges for the do-it-yourself house builder (specifically, this system requires no riveting). We were told the roof would last "easily 20 years" which is great. The panels are cut to a length 2" more than the length of the roof so that they can be hemmed over the drip edge (a piece which goes along the eaves). Someone with a fancy machine shop could use a sheet metal bender for this step (which can also be rented) but we found a 6"-wide "hemming tool" which has worked well. Tragically, it cost $70 (kind of pricey for a glorified set of pliers) and does not seem to have many other uses. However, buying this hemming tool was WAAAAAAAAAYYYYYYYY cheaper than hiring professional roofers -- two different companies visited the job site and gave quotes of $900-1,200. I'd like to order one hemming tool, please.

Picture from Saturday afternoon:


And from just a few minutes ago:

A super cool thing about the SnapLoc panels is that all the fasteners are hidden; one edge of the panel is a standing seam and the other edge a smaller standing seam flanked by a flange (for fasteners). After you put the fasteners in you simply snap the next panel over the smaller seam. Voila! No exposed screws. A piece of butyl tape and a bead of silicone goop are applied to the J-channel piece at the top (beneath the ridge) immediately prior to installing each panel; hopefully this will prevent driving rains from getting underneath the ridge and under the panels.

White was selected for roof color in order to maximize reflectivity in the hot summer; we surmise that the loft could get quite toasty though it does have its own window. Plus, any moss/algae that grows on the roof in ten years will show up better against the white background than, say, dark green and therefore will be easier for future tiny house biologists to study.

Wednesday, October 27, 2010

Getting a Handle on the House


Last night, at long last, a blog-worthy update was made: the installation of the handle on the front door. Work has progressed at a meandering pace in recent months and is now being documented again.

In other news, much of the insulation has been installed. Monkey bars have been installed in the peak of the roof, making the house worthy of habitation. Some of the rake details of the roof have been installed. All of the underlayment is on the roof at this point. No panels have been installed yet.

Check out that door handle!!! Custom made by a generous blacksmithing friend!

Wednesday, July 21, 2010

The Front of the House: Door and Decorative Roof Strip

Not a major workday, but small updates to report:
we forgot to seal the raw wood on the windows so we've masked off the glass and are painting those with a couple coats of BioShield Aqua Resin. Masking is a bit tedious, but it's getting done in the name of giving eternal life to the windows.

Here's what the front of the house looks like at the present time (picture taken one hour ago!):


Behold! The deadbolt was installed in the door. The porch light is visible in this image as well (thank you, Ace Hardware and compact fluorescent light bulb). We have yet to install the top of the door jamb but we'll get on that soon.
The diamond and octagon windows seem to look nice together -- a good thing as this was not really planned or drawn out in advance, it just happened. The two windows on the far right are for the bay window seating area. In the Tumbleweed plans it called for slightly larger windows which had a long lead time from the vendor we chose; these smaller windows were available sooner.
Great! We didn't get any tar paper on today after all but that is still in the cards for the proximate future.

Tuesday, July 20, 2010

All Windows Go

At long last, a full set of 8x10 color glossy pictures with circles and arrows and a paragraph on the back of each one.

Or, short of that, more pictures showing y'all what the heck the house looks like in its current state.

TODAY the last two windows were installed. To make up for the lack of other photos on the blog recently, we took step-by-step photos of the installation of the last window. Here we go:


pic1: Here you can see the Tyvek has been wrapped around slightly on the inside of the rough opening of the window.pic2: the OCTAGON! in the flesh! We had to reduce the width of the window to ensure that the inside surface (on inside of house) would be flush with the interior siding. We've chosen to use 5/16" knotty pine siding for the interior but the window was built for slightly thicker interior siding. However, this was soon corrected. Thank you, jigsaw. The octagon came with flanges to install in a groove all the way around (one flange is visible here).


pic3: Two things of note: Protecto Wrap is used on the bottom of the rough opening to protect the wall against the unlikely event of water accumulation/pooling between window and wall. Silicon is then applied in a bead all the way around the opening. Silicon hardens pretty quickly so you shouldn't start applying it until you've already done a dry fit of the window (with shims) and know exactly where you want the window to go.


pic4: Next, insert the window into the opening and predrill the holes. We used 1-5/8" screws.

pic5: And we're done! Put Protecto-Wrap over the edges to seal out the weather and it's a done deal.

pic6: Blast from the past: a work-in-progress shot of the electric subpanel. It's a 100A subpanel. All components are Square-D.

Woohoo! That's the news of the day. Tomorrow: putting up some tar paper.

Monday, July 19, 2010

The Door is Ajar!

Progress! Last night we hung the door. Hinges, jamb, weather stripping, oak threshold and all. A great event made greater by the fact that the trailer is on a slightly uneven surface so it's hard to say whether the door will swing naturally shut due to being slightly mismounted or if it just might miraculously be completely perfect once the trailer is back on level ground. Only time will tell!

We made the door out of Spanish Cedar, chosen because of its 1) natural built-in bug resistance and 2) bargain basement low price (compared to fancy exotic woods). We learned this factoid: cedar dust is not good for your health. Wear a dust mask when working with it.

It's a panel door and took about 3 full days to make in a friend's woodshop. Necessary tools to build your own panel door are: joiner, router, random orbital sander, chisels, hammer, table saw, and, if possible, a mortising machine (like a drill press but makes, gasp, square holes -- no joke).

Home Depot special ordered us a 10"x10" window for $20 which we put in the door.

What else.... we learned that some brands of metal roofs need their own proprietary type of underlayment. Apparently certain tar papers accelerate the corrosion of steel roofs. Interesting factoid of the day.

We used a deadbolt for the door which is keyed on both sides for added safety. Since there's a window in the door which a thief could ostensibly smash and reach through it seemed like a good idea to make sure there was no lever on the inside of the lock that could be easily turned. When no one's home, the key won't be in the other side. Until world peace descends upon us, this idea seemed prudent, even if there are lots of other smashable windows in the place.

Hooray for doors! The house now looks way more legitimate and house-like.

Friday, June 25, 2010

House Wrap Rap

Camera is out of batteries but progress continues and documentation calls!

The house's current state is this:

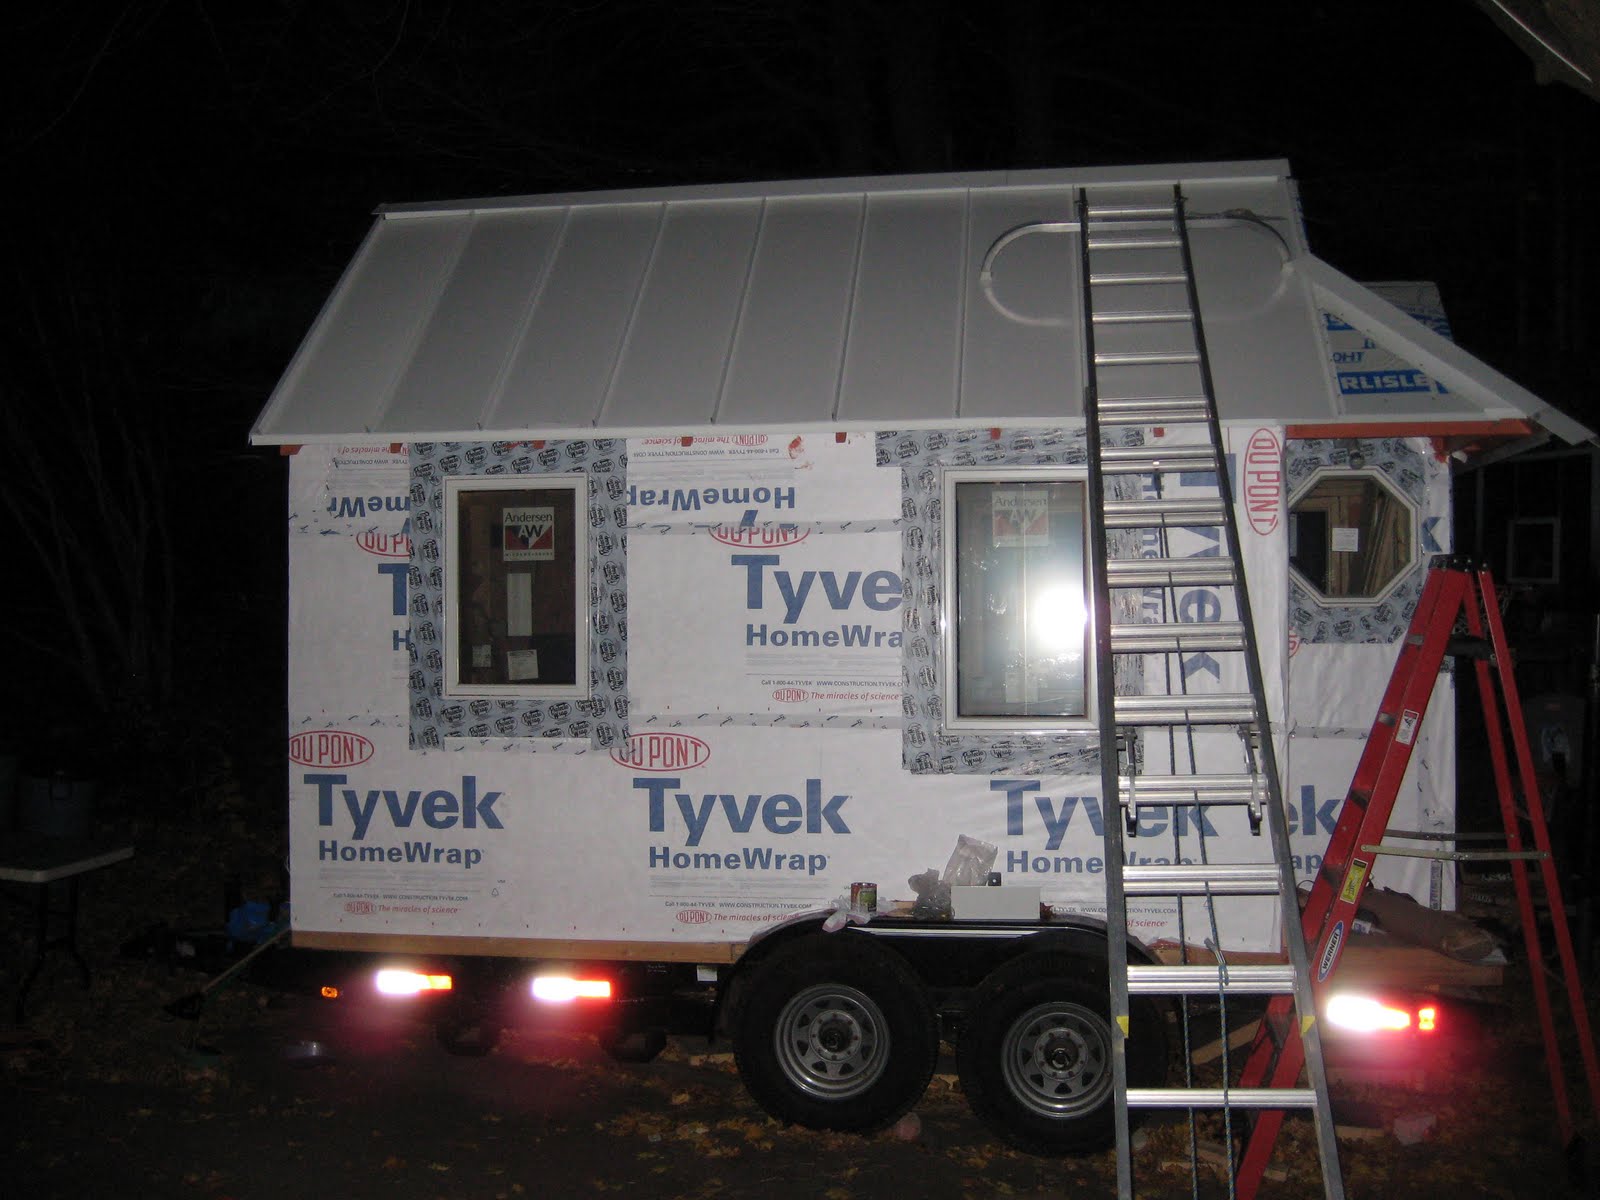
1- Three windows have been installed (the three biggest ones) and sealed with Protecto-Wrap 6"-wide tape as per the window department's recommendations. The extension jambs will be installed later once the interior paneling is more well defined (e.g., in hand). We think the preferred thickness of knotty pine is 5/16" but it's not at the job site yet.

2- The impossible hip rafter is finished!
2a- The impossible part of the roof over the porch is finished!
2b - Did we mention the impossible part is done?!

Basically the front of the Weebee has this complicated little roof which is there to make it look interesting and house-like and well put together, the way the outfit of a well-dressed New Yorker makes you say, wow, that is a well put together person, even though the person may or may not be well put together and, by extension, the house with a nice roof may or may not be well put together. But it's for effect.

Since the plans only included front and side elevations of the roof the actual dimensions of the plywood were not easy to see -- if we had it to do again we'd just use a CAD program, draw this section of roof, and get the dimensions of the pieces from the computer. This would not be a big task even for someone relatively new to CAD. NOTE TO ANYONE BUILDING THIS THEMSELVES WHO HAS NEVER MADE A HIP RAFTER: think about doing some CAD.

For the computerless, another method was used here. We used trigonometry to find the angles on the hip rafter, installed that, cut the plywood down, installed the "dormer window" (the small section of roof directly above the bay window seating area) and then went for the old school style: stapled a piece of house wrap (big paper would also suit) along the hip rafter and along the rafter which runs parallel to the back edge of the trailer (e.g., the rafter at top of bay window area -- we let this run the width of the house) -- then we pulled this paper taught and cut it with a razorblade where it intersected with the sheathing of the dormer window. Now we had a parallelogram-shaped sheet of paper aka a template from which to cut the plywood. This worked well. And, it's finally done. And, admittedly, it adds a nice effect to the aesthetic of the exterior of the house.

3- Most of the Tyvek house wrap is now on -- need to do a couple more sections (front of house and back of house)

4- Framed up a vent for the space above the bay window seat This will help the house comply with building codes enforced by anyone overzealous or diligent It's probably not strictly required since the square footage of the loft is so small and the loft already has a window (which opens) But it seemed like a good idea

5- Installed porch light and kitchen light (and wired them -- they work!)

6- Designed custom door

We were all set to start cutting the boards for the door (a panel door) and then noticed the wood was totally warped. We're working in Spanish Cedar. We mistakenly purchased planed lumber...... should have bought rough lumber so we could make sure it was totally perfectly planed and even since the door really must be even (building a warped door jamb to match a warped door does not seem like a good idea, though it could happen at a place like the Mystery Spot). So everyone went home crying their eyes out over this tragedy. Ok fine no one cried but it was a disappointment.

Interesting fact: "8 quarter" means "2 inches" in lumber-speak. 8 quarter rough lumber is on the order of 2 inches. When you buy smooth lumber, 8 quarter would be about 1-5/8" The ideal width for a solid door is 1-3/4" (the panels are thinner) So, back to the lumberyard to get The Right Stuff and go to town on this door. That will be an activity for next week.

In a stroke of convenience, Jeld-Wen makes a door jamb kit you can buy for $70 at Home Depot -- has the weather strip already installed. Can be cut to length. Hoorah.

The octagon windows don't have built-in vinyl flashing like the Anderson windows we're using for the rest of the house -- we're looking for input on how to seal up the octagons. Possibly just going to bend aluminum flashing and use oodles of silicon goop (that would be a metric oodle, not an english oodle) but interested to hear if anyone has other ideas.

These seem to be the salient lessons learned from recent memory. Onward!

Tuesday, June 15, 2010

A Window on the World

Today we installed the first window: progress! After being forewarned by everyone in the windows department (of a certain large hardware store chain which shall not be named) that it would take half a day to install a window (or we could pay them a paltry sum (300 dollars?! yowza!) to have them install it for us) we overcame our discouragement and went forth into the great blue yonder of DIY window installation.

Piece of cake! In less than an hour, we had the window shimmed in place (so that bottom edge was parallel with floor of house and side edges were even in the rough opening space), silicon-gooped until the end of time, sealed for extra measure with another piece of flashing over the top of the upper edge of the built-in plastic flashing flange, and installed with screws (1-5/8" fasteners were recommended; screws are used here since in the event of driving-down-the-highway road vibrations nails could potentially work themselves out). Here is the photographic evidence:


The eaves were sealed this week with 2x4s ripped on a table saw to have a 45-degree edge -- these were installed in the previously open space between the top of the wall and the underside of the roof sheathing.

In other news, yesterday we installed the hip rafter above the porch and made progress on the "dormer window" shape above the bay window area. The valley rafter still needs to be installed there, followed by more plywood. Then we'll be ready to put tar paper over the whole roof, flashing in the valley/hip, and the actual roof material (metal is planned). No soffit vents are being used.

And! Electricity is happening! All outlets are now wired to the subpanel and have been tested. It is a great thing to be able to plug in a drill or sawzall to an outlet INSIDE the house while working. Less tripping on extension cords. More glory.

Stay tuned for the upcoming chapter: let there be light!

Sunday, June 6, 2010

Astronauts Take Over the Weebee


Today astronauts invaded the Weebee and inspected key features. They brought a number of space-age tools in apparent preparation for repair and maintenance procedures. Mission command specifically assigned them to the roof eaves assessment and creation mission, which they accepted with only minor chagrin.
Fortunately, the astronauts also brought along their payload specialist, the bagpipe player.


Saturday, May 22, 2010

Roof Work Illuminated

Updates from the last week -- we framed the roof this past week and held a ridge ceremony on Monday night, nailing a pine branch to the ridge. We then completed the rest of the rafter pairs and put the sheathing up. Here's a picture of the cutouts on the exterior plywood where the rafters go. This was measured out beforehand to enable fast rafter installation. The reason for the cutouts was to minimize the amount of material to be removed from each 2x4 for the bird's mouth cuts.

To put the ridge up, as described previously, the rafter coordinates were laid out on the ridge piece on the ground. Here's an action shot of the ridge installation. You can see the metal brackets which were preinstalled on the ridge. Three rafter pairs were sufficient to hold up the ridge.
Next, the plywood sheathing was installed lengthwise (e.g., long side parallel to long axis of trailer). First we installed the shorter piece (at the eaves), which was about 19 inches wide. We then lifted up the larger piece (the full 4'x8' sheet) and rested it on this smaller piece, rotating it around the seam such that it lifted slightly off each rafter so that glue could be squeezed into the gaps. Then we lowered it back into place. Next, we slid the sheet up about 1 inch (up toward the ridge) and installed plywood clips at the unsupported edge for strength. Then we let the sheet slide back down into place and proceeded to place screws every 6-8 inches as for all other sheathing. We found it helpful to stand in the window openings while installing the roof sheathing -- yet another reason not to install the windows quite yet.

There is a double rafter pair at the extreme end (the trailer hitch side of the trailer, i.e., the back wall of the house) since this wall must be wide enough to accommodate insulation. All told there ended up being 9 rafter pairs for this main portion of the roof.

Tonight we finished framing the pseudo-dormer window on the front of the house (it's not really a window but we're not sure what else to call it). We will proceed with sheathing that portion later.

Monday, May 17, 2010

Installing the First Rafters

Today we installed the first three rafter pairs and put up the ridge -- a milestone indeed! We set up a cot on the floor of the loft to enable a creative method of clamping... wherein one person lies on their back and holds up a rafter pair while the rest of us scamper around installing other rafter pairs. We decided three rafter pairs would be enough to hold up the ridge (the 165-inch 2x4 which is directly beneath the peak of the roof). It took five people to complete the ridge installation -- one human clamp (on cot on loft), one human foundation (holding a 14-foot 2x4 vertical as a support for another rafter pair), two scampering drill wielders leaping from beam to beam to install metal brackets supporting each rafter, and one videographer to document the scene. The videographer was soon pulled into the fray as well though, rest assured, filming continued.

Rafters were laid out using a template drawn to scale on a spare sheet of 4x8 plywood. To make the bird's mouth cuts (notches where rafter meets top of wall) each piece was placed on the template and marked accordingly.

The location of each rafter on the ridge was marked beforehand and small angle brackets were installed on the ridge while it still lay on the ground. This meant less awkward drilling while the human clamp's endurance was being tested -- all that needed to be done in terms of alignment was to anchor each rafter to the top of the wall and then place it against its designated bracket on the ridge and drill in two screws.

The rafters are 24" on center with one exception for installation of the skylight.

The next step will be to install the remaining rafter pairs and then sheath the roof. Exciting times!

Wednesday, May 12, 2010

Action Shot:: Installing Sheathing


Here is a view of the house-in-progress with the porch in the foreground. You can see the nail plates along the back wall intended to protect the electrical wiring from misguided future construction events (e.g., modifications). 2x6 cedar boards have been installed for looks. The glorious blue tarp is currently serving as a pseudo-roof in order to enable inclement weather progress.

Tuesday, May 11, 2010

Sheathing the Frame

Welcome to the blog about building a Weebee! Here you can track the progress of this epic project and, hopefully, learn new things about buildings/structures/windows/mobility.

This has been mostly a weekend/evening project. The steps completed thus far:
-flatbed trailer acquisition
-installation of subfloor
-completion of wall frames
-installation of wall frames onto subfloor
-installation of loft floor joists and plywood (used 1/2" plywood)
-installation of some of the wall sheathing

So, in other words, it looks like half a house.

To put the 3/8" sheathing on the outside of the house, construction adhesive is applied to the studs and then the plywood is clamped in place and secured using 2" screws with ~8" spacing. In order to cut the right shape for the wheel wells, the plywood was temporarily clamped to the inside of the wall next to the wheel well so that the outline could be traced onto it directly (a piece of aluminum flashing placed along the wheel well helped with the trace). This was then cut out with a jigsaw and final adjustments were made with a plane and a random orbital sander. Silicon caulk (100% silicon) was used to seal the plywood-wheel well interface.

Alright! Back to work.