Thursday, December 20, 2012

Wheel Skirts for Posterity

After almost six months of full-time habitation, the time has come to enhance the aesthetics of the underbelly of the beast -- we are currently in the middle of inventing a (perhaps slightly overbuilt) wheel skirt device to hide the wheels and hitch.  Perhaps this will have a utilitarian heat-retaining function in the dead of winter.  This remains to be seen.  In the interim, here are some pictures of the half-built contraption:

The photographer's breath is apparently visible in the foreground.

Sloped top piece may finally alleviate the water-bouncing-on-wheelwell issue.

Spring will be a good time to refinish the cedar.

Sawhorses will not be part of the final version.
 
Ultimately, this will be painted an exciting shade of brown or dark red.  Stay tuned!

Saturday, July 7, 2012

Some cabinet doors

As per the tiny house school of thinking (which says that these houses feel much larger when thing


s are hidden away as opposed to being displayed as piles of stuff on shelves every which way you turn), we have installed three cabinet doors.  A sleek pine look has been added to what was previously an open closet


These two doors hide the closet:
This door hides the triangle shelf area:
The material is dimensional lumber -- clear pine, 1x6 (which is actually .75" by 5.5").  The pieces are held together with two stringers across the back (see line of screws).  No diagonal piece was deemed necessary.

Sink: Solved!

This is an open letter to the engineering profession.

Dear Engineering Profession:
Thank you for your existence.  Without you, we would simply accept reality as it is without adding any creativity or problem-solving-ness to either the mundane, everyday matters or the space shuttle.  Today, thanks to you, we drilled a new hole in the sink and all seems well with the kitchen faucet.  Ingenuity triumphs again!!!
Sincerely,
The Build Team


Friday, July 6, 2012

The Sink: Prototype

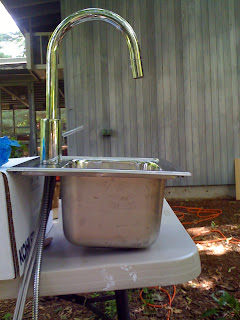
Basically there is a Catch-22 here: 1) install a large sink that will be easy to wash dishes in but sacrifice the ability to have a fridge under the counter; 2) install a fairly small sink which will require a fairly small faucet. 
Given these options, this setup is what we are currently thinking about.  This may work.  Or this may make water splash all over, creating a veritable water park in the tiny kitchen.

It is summer, after all....


Monday, July 2, 2012

New Kitchen Shelf!

Haven't posted an update in a while, but a new shelf has been built in the kitchen -- and the house got moved!!!  We'll post more details about the recent progress, but in the meantime here's the new shelf:


Perhaps you have to rotate your head to see it.

Saturday, June 2, 2012

A Coat Rack

There is now a brand-new custom color glossy coat rack with a paragraph on the back of each one in the tiny house:


All the pre-fab ones at the hardware store were junky looking.  Plus, obviously, it was important to match the color of everything else in the tiny house.

Safety equipment proudly displayed.

Tuesday, May 29, 2012

Yet Another Shelf

Inspired by the folding desk design, we made a shelf in the same curvy image.  Perhaps this top shelf can be used for cereal boxes and dried lentils while the lower shelf is used to store camping mugs and small kitchen implements.

Not everyone knows this, but the Buddha sculpture is permanently attached to this shelf in order to bring maximum equanimity (which you can't buy at Target, despite popular belief) to the tiny house even while it is being moved down the freeway to top speed.  Built-in Buddha!

Is it sufficient to hang this whole shelf with just 12 wood screws into the loft joists?  Only time will tell.....

Kitchen Counter Revisited

Well, friends, we modified the kitchen counter design owing the fact that it would be a profligate use of steel to make such a large L-shaped thing out of one piece of sheet metal (lots o' waste) and, more to the point, highly pricey. 

Hence!  A new design was created -- the so-called "ultra great split-level two-piece design" which has a 1" step-down from the main counter top to the part that contains the stove.  This in fact mimics the original Weebee design.

First we framed it with 2x4s:
 (placed the fridge underneath just for a frame of reference and because there needed to be some creative thinking in order to enable the fridge door to open more than a few inches -- other tiny house builders have special-ordered ultra-narrow fridges but this fridge appeared spontaneously as a gift and is having its time in the sun right now).

Next, we put 1"-thick plywood over top of the whole thing and lined up the countertops.  We even dropped the sink and stove in place for a bit of a "staged" look at what the future kitchen will be like.  In the pile of tools in the corner of the Weebee there are all kinds of great things like webbing and duck tape and, apparently, a stainless steel pot to complete the staged effect.

One kitchen down, one bathroom to go!

Wednesday, May 2, 2012

Design for Kitchen Countertop

Worked on designing the kitchen countertop today and sent out to vendors for quotes.
The original Weebee design calls for a slightly different countertop.  Decided an "L"-shape could be more useful/robust/impervious to kitchen grime.  The stove won't be perfectly centered underneath the window but this is probably not a major aesthetic issue.  Might change the 86" length to slightly shorter.  Other than that, this is the sketch!  Stainless steel!!!!!!!!!!!!!!!

Cutout A is for the sink, which will be this model:

http://www.us.kohler.com/webassets/kpna/catalog/pdf/en/116366_4.pdf

Cutout B is for the stove, which is a drop-in two burner stove by the brand Suburban.

Tuesday, April 24, 2012

Closet and Shelves!

Wahoo! A shelf and a closet (with more shelves) are now complete.
Well, also a ladder.
Everything is pine.
Note the lack of fasteners on the visible side of the shelf.  This made us (every so slightly and probably a bit too) proud.

Thursday, April 19, 2012

Converting the Bench Seat into a Desk

Removed top shelf and tested out options for desk angle
 Today we finished the modification of the bench seat -- transmogrifying it into a transformable desk/bench/shelf system! 

 There's not much room in the Weebee until you MAKE MORE ROOM via clever means (well, we hope this was clever -- perhaps it's in the eye of the beholder).  The idea here is that perhaps everything in the house should serve at least two purposes.  This may be more of an ideal than a working reality but, for now, the bench/desk/shelf embodies the ideal.
Is that a skull and crossbones?
 To make the appropriately crazy curved desk edge we used aluminum.
 We then made an equally crazy frame to support the crazy edge.

Here's the system in Bench Mode -- add pillows for enhanced comfort.

And, now: the system is seen in Desk Mode!  Note shelf in lower right.

Monday, April 16, 2012

Chop Wood, Carry Water: a new shelf and more siding

A number of small edges and corners still needed to be filled with siding when we started the day.
We began to chase down these loose ends.
Additionally, we dreamed of a bookshelf that would be located above the door. Why waste precious space? Most books won't fit vertically but a few could assuredly be stacked. And so a bookshelf vision was born.
Lots of tiny house work actually occurs after sunset (who knew?) lit by halogen worklights. For these upper corners it's great to do the layout on a table first and then nail things in place.
Voila! Still needs some trim around and above the door and in the uppermost triangle. But, aside from these things, we're inching up on having the exterior all zipped up.

Finally, while resting on our laurels at the end of the day, we tested out the bookshelf. It works! Huzzah!

Saturday, April 14, 2012

Exterior Siding Nooks and Crannies

"Hey, farmer, when you gonna fix that leakin' roof?"
"Well, stranger, when it rains it's too wet to fix it and when it's dry it's as good as any man's house."

Indeed, we may have felt the same way about the small triangle of siding which was missing from the octagon window area of the front of the house... until today! Tiny house gnomes again emerged from the backyard (where DO they all live?!) and completed the job with time to spare against the backdrop of a gorgeous 70-degree day.

Long live the cedar siding.

Thursday, April 12, 2012

Framing the Bathroom Walls

Thought about framing the bathroom walls in 1x3 or 2x3 but if this house is located in a cold climate and hot showers with *real live running water* are desired the wall may need to contain plumbing. Hence, 2x4s continued their monopoly in the tiny house framing market.
Pre-drilled down through the loft floor into the studs at the corners (countersinking bit so that no screw heads stick up through the loft floor). At the bottom, angle brackets are used to connect the vertical joists to the stud plate. Not bad for an evening work session which included a dangit-we-ran-out-of-2x4s run to the local lumberyard. Next step here is to build out a closet from this wall into the main room of the house. Upcoming presidential candidate debate topics: will the tiny house contain a kitchen sink?

Only time will tell.

Sunday, April 8, 2012

Bench Seat and Storage Shelves

Today we framed in a bench seat (w/ enhanced levels of storage! aka a shelf below it) using whatever wood was available in the rafters of the garage (owing to the holiday it is apparent that no hardware stores are open). In the infinite future an additional joist will be added for the top shelf since it may need to support the weight of a couple of people sitting along the bench.

While the intent here is to store file boxes and books, it could potentially make a nice chicken coop. (joking)

Friday, March 2, 2012

Interior Siding Tidal Wave

After the snow storm of yesteryear died down, tiny house gnomes came out of their caves and set up the work tables and tools.


Final taping of heretofore un-taped plastic seams took place unceremoniously.
And the rising tide of completeness took over the south wall!!!!!!!!!!!! Awoooooga! Monkey bar cutouts were made with the Fein Multimaster tool aka The Nibbler. It is so great to post this picture after an intensely focused work session. Yeah knotty pine.

Thursday, March 1, 2012

J-Turns for the Win

You know, tiny house ownership is an act of social consciousness and small-footprint living. What if all citizens in post-industrial society considered their footprints -- big and small -- each day? Today was a snow day for local schools and, indeed, the tiny house building crew. Hence, the study of car footprints was undertaken by an intrepid "what if I use the e-brake?" soul.


Perhaps this was a departure from leave-no-trace philosophies of minimal impact and non-fossil fuel dependencies. Or perhaps this was just an endeavor in becoming a safer driver so that if the tiny house ever needs to be transported during a snow storm it will be uber safe. Onward!

Sunday, February 26, 2012

Interior Siding Wave Action

Indeed, interior siding is now complete on the shelf area adjacent to the front door and directly above the Reading Room. The shelf has been framed. A wintertime plug has been made for the attic vent. What more could one want? Trim was added just for grins.

Friday, February 24, 2012

The Rising Tide of Interior Siding

The shelf above the library is being framed here -- joist hangers are used to enhance strength and stamina of said shelf. A plug will be made for the attic vent to avoid wintertime draftiness.

Nailers were installed on either side of each monkey bar. Siding to follow...
Here is the "view from above" ("view from the loft") of the shelf and front of house -- siding has begun to creep up the left-hand wall, almost to the level of the monkey bars. Attic vent remains petulantly unplugged. Astronauts are nowhere to be found -- probably hibernating for now.

Heater and Chimney Installed!

Work continued fastidiously on the chimney last week and the effort paid off! After reading the Dickinson Marine P9000 heater manual for ten hours (just joking: 25 minutes) it was discovered that the chimney should not endure too tight of a bend. Circumferential springs serve as spacers in between the exhaust pipe and the outer pipe -- we moved two of these so that they were located at the bend site to help alleviate pressure / avoid any hotspots (where the inner pipe might touch the outer pipe). The space between the two pipes is the intake. So clever!
Just as certain Aztec gods might be involved in really well-written myths and stories, the God of Fish is the protector of the Weebee heater in this particular story. In a fitting twist of fate, it turns out this is a boat heater -- what one might use on a personal yacht in the winter time (though it seems likely that no tiny house owners are also yacht owners) -- so the God of Fish is indeed pleased. A small fish talisman has been placed on top of the heater to ward off evil spirits (aka to protect the shiny metal finish of the backplate while construction proceeds).

The next step here will be to actually install a propane tank and propane lines. Until then, electric space heaters and work lights to the rescue!

Wednesday, February 1, 2012

Installing Chimney -- Step 1

We considered installing the chimney in the roof as per normal instructions --- but found that the maximum allowable lengths of chimney (as per Dickinson Marine spec sheet) did not permit the heater to be located underneath the appointed window. Hence, thus, and ergo, a completely new heater site was inspected and selected (not to mention neglected and infected). With this new development, a chimney hole would be needed in the SIDE of the house. Work proceeded according to the new plan.
First, the nibbler tool was used to excavate a square-shaped area from the exterior siding (see above). Cedar blocks were installed here to provide a backing.


3" hole saw enabled accurate hole drilling.
A scout was sent in to examine whether or not the insulation was adequately distant from the perimeter....

And an elite team of excavators followed him, with all manner of tool and toy, to complete the work. Quarters were cramped but, after all, this is a tiny house.

We continue to not take ourselves too seriously. Stay tuned for more developments from Team Chimney!